
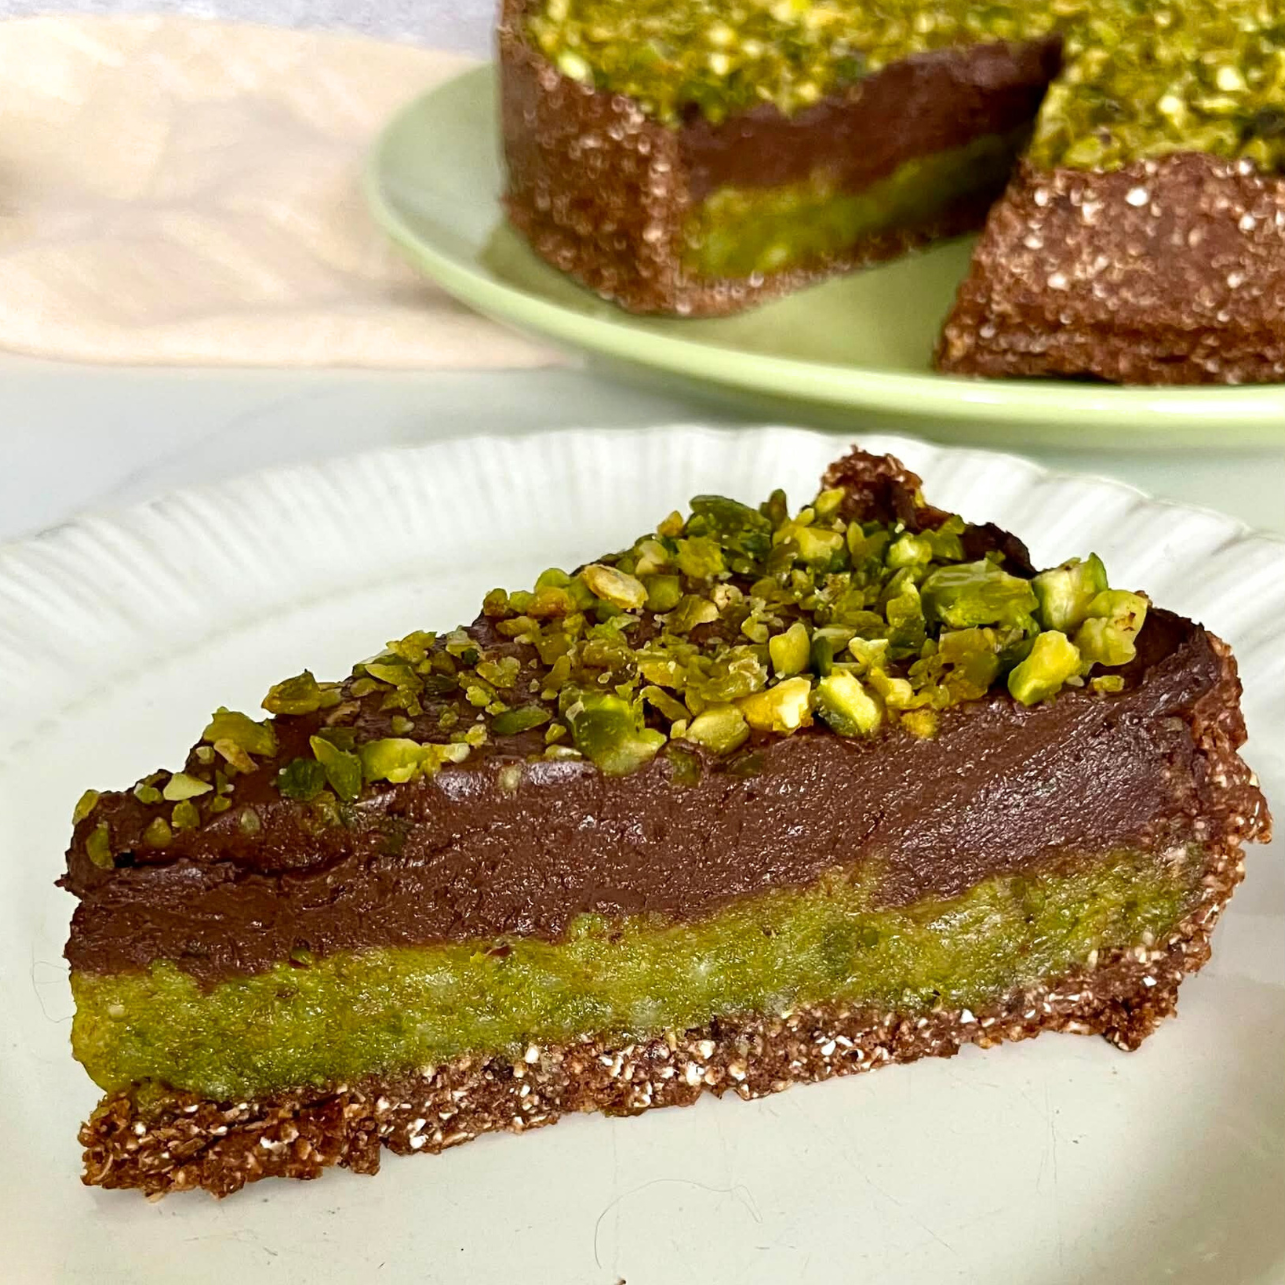
Made with health-forward cocoa powder, this sinfully delicious chocolate ganache pie doesn’t contain added fats or refined sweeteners. A lively green pistachio frangipane filling harnesses the chewy sweetness of dried pears to create a visually stunning contrast that’s sensually layered. It’s the perfect make-ahead dessert for special occasions.

CREATING A PIE THAT LOVES ME BACK
I’m pretty far along in my whole food plant-based (WFPB) cooking journey. So far along, in fact, that I’m publishing recipes in this blog! But I’m still amazed by how decadent a healthy whole food vegan dessert can be. This recipe is my WFPB answer to the Dubai chocolate craze that’s taken over the planet. Chocolate and pistachio is a spectacular flavor combination. But food usually enters our consciousness through the eyes. We can fall in love with food at first sight before our tastebuds can form an opinion. That’s where pistachios have an advantage over all other nuts. Bright green pistachios make for a stunning color contrast against dark chocolate. My first challenge in creating this recipe was to come up with a way of making a sweet bright green pistachio paste that didn’t rely on white sugar, a highly processed refined sweetener avoided by people following a WFPB lifestyle. Dates are my go-to whole food sweetener, but the thing about dates is that they make everything darker. More often than not, the darkening property of dates is not a problem, but in this recipe dates would have robbed the pistachios paste layer of its colorful vibrancy. I came up with the idea of using dried pears for the pistachio paste because their golden yellow color doesn’t dull out the green of the pistachios. The result was next level! Pears have a unique grainy texture and honey-like flavor that compliments the subtle earthy nuttiness of pistachios. I boosted the sweetness of the paste with a little maple syrup and intensified the greenness with a small amount of matcha powder. For the chocolate ganache, I adapted my recipe for silken tofu based chocolate custard. The oat-based crust is simple to make, easy to work with, gluten-free (use gf oats if necessary) and adds a grounding textural base while boosting the chocolate impact.
FOOD PROCESSOR NEEDED
Let’s get this part out of the way. You need a medium to large size food processor for this recipe. I have not tried using my high speed blender to make this pie so I can’t recommend it. That being said, the chocolate cream layer would benefit from a high speed blender, but then you’ll have one more appliance to clean.
MAKE ROOM IN YOUR FREEZER
Part of the process for making this pie is using the freezer to chill layers. Partial freezing ensures that the layers remain distinct making the pie more visually appealing.
WHY RAW PISTACHIOS
I prefer using raw pistachios in this recipe because they have a brighter, greener, color. Really, that’s the only reason. But it’s an important one because the optics of this pie are an important part of the experience. If you can only find roasted pistachios, go ahead and use them, but know that your results will look different than what you see in my photos.
SOAKING PISTACHIOS IS IMPORTANT
Soaking pistachios for the paste: Soaking the pistachios used for the paste is crucial to this recipe in order to soften them so you can create a smooth frangipane-like paste, to remove some of the natural bitterness of raw pistachios and improve color. My favorite way to soak pistachios is to place them in a jar, cover them with water, cover the jar with a lid and refrigerate overnight or for up to 24 hours then strain before using. That’s the best slow soak method. But if you don’t have time for a slow, simply place pistachios in a bowl, cover them with boiling, let them soak for at least 20 minutes (more is better), then strain.
Soaking pistachios for the topping: Using chopped pistachios as a topping for this recipe is optional but sure looks pretty when you manage to peel the skin off most of the pistachios prior to chopping. Chopped pistachios don’t need to be particularly soft, but you do need a one minute soak in boiling water to make the peels come off easily. Simply place the pistachios in a small bowl, cover with boiling water, wait for 60 seconds and strain. Now you’re ready for the somewhat tedious task of peeling the skins off the pistachios. I like to do this by rolling them around on a clean dish towel. Fortunately, 3 tablespoons of pistachios should take less than 5 minutes to peel.
MATCHA POWDER FOR COLOR
The matcha powder in this recipe is used mostly as a way to intensify the greenness of the pistachio pear paste. Although the single teaspoon of matcha does contribute a subtle layer of earthy aromatic flavor, you’d be hard pressed to identify it.
SHELF STABLE SILKEN TOFU
Firm or extra firm shelf stable silken tofu makes for a beautifully smooth ganache-like chocolaty layer. The versatility of silken tofu for plant-based cooking can’t be overstated. The shelf stable version is perfect for desserts and always ready to go on your pantry shelf, no refrigeration needed. I stock up whenever I’m at my favorite Asian grocery store, but you can often find it at regular grocery stores in the non-refrigerated Asian foods section or order online.

SQUEEZING SILKEN TOFU
For this recipe, I remove as much moisture from the firm, or extra firm, silken tofu as possible. If you have a tofu press, trust me, you don’t want to try to use it for this. Silken tofu is way too soft for a tofu press. Instead, I use a cheesecloth or several absorbent lint-free cloths. First I drain off the obvious liquid from your tofu as soon as it comes out of the box. After that, there are a couple of different ways to proceed with the moisture removal. One way is to wrap it with a couple of lint-free, absorbent, cloth napkins or dish towels, place it on a plate and put something heavy on it, like another plate, and leave it like that overnight or for up to 24 hours inside the fridge. This works if you have the time. But keeping in mind that for this recipe the tofu does not need to keep its shape, I prefer to use a cheesecloth, or similar type of fabric, over a mesh strainer to squeeze the liquid out of the tofu. I start by placing my mesh strainer over a bowl. Then I place the cheesecloth over the mesh strainer. The mixing bowl under the strainer is there to catch the excess liquid. I place the tofu over the cheese cloth and begin crumbling it using a spoon or my fingers. Part of the liquid is released right away. Then, to remove as much of the liquid as possible, I wrap the cheese cloth around the crumbled tofu and gently squeeze. When I feel like I’ve gotten most of the liquid out of the tofu, I carefully remove the tofu crumbles from the cheese cloth and place them in a small bowl while I gather my other ingredients. The liquid captured in the bowl under the strainer can be discarded.


DRIED FRUITS FOR WFPB CONFECTIONS
Dried fruits are the perfect sweetening agents for whole food plant-based (WFPB) recipes. Because they are whole plant foods, they increase nutrient density and add fiber. They can also act as binders that hold things together and lock in moisture eliminating the needed for added oils and other processed fats.
Dates are my favorite whole food plant-based sweetening ingredient. In this pie dates are used in the crust and in the creamy chocolate layer. Dried pears were my choice for the pistachio paste because their lighter color doesn’t interfere with the vibrant greenness of the pistachios. The subtle honey-like sweetness of pears also compliments the earthy nuttiness of the pistachios.
Chopping the dates and pears first makes it easier to measure them because chopped dried fruits are more easily packed into measuring cups. With dates and other pitted fruits, chopping also gives you the opportunity to check for pits and hard bits. More often than not, especially when it comes to dates, pitted means mostly pitted, and there will always be a few hard stems.

COCOA POWDER IS A WHOLE PLANT FOOD
Rejoice! Cocoa powder is a whole plant food with a number of nutritional benefits. Although processing is involved, cocoa powder is derived from whole seeds of the cacao tree, and retains many of the nutrients present before processing including fiber, antioxidants and minerals like iron, magnesium, copper and zinc. There are two types of cocoa powder: natural and Dutch-processed, a.k.a. European-style cocoa powder. If you want to maximize the nutritional benefits of cocoa powder, go for natural instead of Dutch-processed because in removing some of the acidity, the Dutch processing technique also decreases flavanol content. And flavanols are powerful antioxidants with a variety of health enhancing benefits. But that doesn’t mean that Dutch-processed cocoa is bad for you, only that it’s a little less good. Natural cocoa powder will always be more acidic. If the tang bothers you, then go with Dutch-processed.
ROLLED OATS FOR A SIMPLE GF CRUST
Rolled oats are the perfect base for a simple no-bake chocolate pie crust. Processing them with cocoa powder, dates, and ground flaxseed creates a dense cookie-like crust. This recipe was designed to be made with rolled oats. Steel cut oats will not work at all so don’t even think of using them. Quick oats might be okay but I haven’t tried using them. As always, if you are gluten free for a specific medical reason, be sure to use oats that are labeled gluten-free. Although oats are a naturally gluten free grain, most commercial oats are contaminated with some amount of gluten unless they are labelled as gluten-free.
MINIMIZING CLEANUP
Each layer of this pie comes together separately in the same food processor bowl. This in itself minimizes cleanup, but not if you need to clean your food processor bowl after each step. I ordered the steps to this recipe so that the green pistachio layers are prepared before the chocolate layers. That way you don’t have to worry about chocolate muddying up the color of the pistachio layers or having to clean the bowl between steps to prevent this from happening.
PEELED CHOPPED PISTACHIO TOPPING
This part’s optional, but topping this pie with bright green chopped pistachios is so pretty and only a little extra work so I recommend doing it. The visual appeal is heightened by peeling the pistachios before chopping them. First, place 2 to 4 tablespoons of pistachios in a small bowl or mug and cover them with boiling water. Allow them to soak for one minute, strain them and place them over a clean kitchen towel. Use your fingers or part of the towel to rub the pistachios around so that their papery skins become loose. Remove as many of the loose skins as you can without going nuts trying to remove every little stuck-on skin you see. Then place the pistachios in the bowl of a food processor and pulse until you achieve a visually appealing level of choppiness, being careful not to go too far or you’ll end up with pistachio butter. Very quick pulses are best.


PISTACHIO PEAR FRANGIPANE PASTE
I make the pistachio pear filling before making the crust so that the filling won’t come into contact with cocoa powder and dates that would muddy the color without my having to wash my food processor bowl between steps. The filling is very easy to make. If you haven’t already done so, remove the peeled pistachios from the bowl of the processor. Place chopped pistachios in a small bowl and set them aside. Then place all the pistachio paste ingredients in the bowl of the food processor and process until you form a smooth paste. You may need to open the food processor a couple of times and push down the mixture from the sides of the bowl using a silicon spatula. The paste doesn’t need to be perfectly smooth, and as you can see in the photos below, mine is not. But if you want a very smooth paste, go for it. Don’t worry about over-processing. When you get as smooth as you like, remove the paste from the food processor, placing it in a small bowl.


EASY NO-BAKE CRUST DOUGH
The pie crust comes together in the same food processor bowl. No need to clean off any pistachio paste residue. Simply place all the crust ingredients in the bowl of the food processor and process for approximately two minutes until a dough forms that clusters together and pulls away from the sides of the food processor bowl. You will still be able to see little white oat specs.


FORM THE PIE CRUST
To form the crust transfer the crust dough into an 8 inch springform cake pan. First, using your fingers, spread the dough over the bottom of the pan and going up the sides as evenly as possible. Then use a flat bottom untapered glass, or a measuring cup, to pack the dough more firmly and evenly, starting from the center and moving outward. Push crumbs against the sides to build walls, using your fingers or the cup to create even, packed edges. When you’re done forming the crust, place the cake pan in the freezer for at least 10 minutes.


CHOCOLATE GANACHE LAYER
While the pie crust is in the freezer you can put together the creamy chocolate layer with time to spare. You don’t need to wash your food processor bowl or blade but you may want to wipe away any chunky oat crumbs that got stuck there after making the crust. If you haven’t already squeezed out the excess water from the silken tofu, do it now (scroll back up to view my method). Then place the silken tofu and all other chocolate ganache ingredients in the food processor and process until smooth. For this step I recommend being patient and getting the mixture as creamy as possible. You will need to use a silicon cake spatula to push down the mixture from the sides of the food processor bowl several times in order to incorporate all of the ingredients. Take out the blade carefully removing the stuck-on chocolate ganache. Leave the ganache in the food processor bowl and set aside.
↣ Note: Add extra liquid if absolutely necessary. If you did a thorough job at squeezing out the silken tofu and the dates you’re using are dry, you may need to add a little bit more liquid, either plant milk or water. Add just one teaspoon at a time, processing thoroughly after each addition. The thicker the ganache the better, so liquid needs to be kept at a minimum.


LAYERING THE PIE
Take the chilled crust out of the freezer and begin by spreading the pistachio pear frangipane layer. I like to do this part with my hands. The paste is very sticky. The trick, for me, is to keep my fingers wet while I spread the pastes. I start by placing a small bowl of water nearby so I can wet my fingers as often as needed. Then I spread the paste over the pie crust. When the paste is evenly layered I pop it back into the freezer for another ten minutes. Though not absolutely necessary, a quick freeze will make the pie more visually appealing by keeping the layers distinct.


After you’ve chilled your frangipane layer, spread the chocolate ganache over it as smoothly as possible. A frosting knife is helpful for this step but not essential. You can also use a silicon cake spatula.


Next you top the pie with a pinch of medium grind sea salt. The salt crystals really help the other flavors pop, so I wouldn’t skip it. An optional sprinkled layer of chopped peeled pistachios gently pressed into the ganache is more about presentation than anything else. But, hey, looks are important. After that, the pie should be refrigerated for a minimum of two hours before removing the springform ring and serving.


related recipes you’ll love


No-Bake Vegan Chocolate Pistachio Pie WFPB Gluten-Free

Equipment
- Food Processor
- 8 inch Springform Cake Pan (20 cm)
- 3 Small Bowls
- silicon cake spatula
- Clean kitchen towel for peeling pistachio topping
- Flat bottom untapered glass or measuring cup for pressing pie crust (optional)
- Cheesecloth or other thin absorbent lint-free fabric for squeezing tofu
- 1 Medium mixing bowl
- Strainer for tofu squeezing process, preferably mesh
- Frosting Knife (optional)
Ingredients
Topping
- 2 to 4 Tbsp raw pistachios (optional)
- 1 pinch medium grind sea salt
Pistachio Pear Frangipane Paste
- 1 cup raw pistachios, pre-soaked* then strained (Measure, then soak. Scroll down to Notes for ways to soak pistachios.)
- 1 cup dried pears, coarsely chopped then measured
- 2 Tbsp maple syrup or agave
- 1 tsp matcha powder
- ¼ tsp almond extract
- ⅛ tsp salt
Chocolate Oat Pie Crust
- 1½ cup rolled oats (certified gluten-free if necessary)
- 1 cup dates, pitted and coarsely chopped (packed)
- 3 Tbsp cocoa powder
- 3 Tbsp plant milk
- 1 Tbsp ground flaxseed
Chocolate Ganache Layer
- 11.9 oz package shelf stable silken tofu, extra firm or firm
- ⅔ cup dates, pitted and coarsely chopped (packed)
- 6 Tbsp cocoa powder
- 3 Tbsp plant milk
- ½ tsp vanilla extract
- ¼ tsp almond extract
Instructions
Prepare the Peeled Chopped Pistachio Topping (optional)
- Place 2 to 4 tablespoons of raw pistachios in a small bowl or mug and cover with boiling water. Let the pistachios soak for one minute and rinse.
- To peel pistachios rub them around on a clean kitchen towel so that the skins loosen up. Then remove as many of the dark papery skins as possible.
- Place peeled pistachios in the bowl of a food processor and pulse until they are chopped. Be very careful not to over-process or you'll end up with pistachio butter. Very brief pulses are best. Stop after each pulse to determine if you've gone far enough. Refer to photo in the main recipe text to see what I think is a good level of choppiness.
- Remove chopped pistachios from food processor bowl and set aside.
Make the Pistachio Pear Frangipane Paste
- Place all ingredients for the pistachio pear frangipane paste in the bowl of the food processor.
- Process ingredients until they form a smooth, or mostly smooth, paste. If necessary, use a silicon spatula to push down the sides of the mixture. Don't worry about over-processing. Refer to photo in main recipe text to see how smooth is smooth enough for me.
- Remove pistachio pear frangipane paste from food processor, placing it in a small bowl. Set aside.
Make Chocolate the Oat Pie Crust
- You don't need to clean the bowl of the food processor before this step.
- Place all ingredients for chocolate oat pie crust in the bowl of the food processor and process for approximately 2 minutes until a dough forms that clusters together. Small white oat specs will still be visible.
- Transfer pie crust dough to an 8 inch (20 cm) springform cake pan.
- Begin by using your fingers to press dough into the pan and up the sides. Then, use the bottom of a flat-bottom untapered glass or a measuring cup to pack the dough evenly, starting from the center and moving outward. Push crumbs against the sides to build walls, using your fingers or the cup to create even, packed edges.
- Place formed pie crust in the freezer for at least 10 minutes.
Squeeze Out Water from Silken Tofu
- It's important to remove as much excess water from the silken tofu as possible, so don't skip this step.
- Place a strainer over a mixing bowl and the cheesecloth, or another kind of absorbent lint-free cloth, over the trainer. The mixing bowl under the strainer is there to catch the excess liquid.
- Remove shelf stable silken tofu from its package and place the it over the cheesecloth and begin crumbling it using a spoon or your fingers. Part of the liquid is released right away. Then, to remove as much liquid as possible, wrap the cheese cloth around the crumbled tofu and gently squeeze. When it feels like you've gotten most of the liquid out of the tofu, carefully remove the tofu crumbles from the cheese cloth and place them in a small bowl. The liquid in the bowl is discarded.
Make the Chocolate Ganache
- If there are crumbs left on the food processor bowl or blades, wipe them away with a moist towel. There's no need to wash it completely.
- Place the tofu with liquid removed and all other chocolate ganache ingredients in the bowl of the food processor and process until a smooth custard forms. You will need to push down the mixture from the sides of the bowl several times. Be patient. This could take several minutes of processing. If the dates you're using are very dry you may need to add a little bit more liquid, either more plant milk or water, one teaspoon at a time. Try to use as little extra liquid as possible.The ganache should be creamy but quite thick.
- Remove the blade from the food, carefully scraping off the ganache that's stuck to it. Leave the ganache in the food processor bowl and set aside.
Spread the Pistachio Pear Frangipane Layer
- Remove the pie crust from the freezer.
- Transfer the pistachio pear frangipane paste onto the pie crust.
- Wet fingers are the best way to spread the frangipane paste which is very sticky. Place a small bowl of water nearby to wet your fingers as you press and spread the frangipane paste over the pie crust. Try to get it as even as possible.
- Place the frangipane paste covered pie crust back in the freezer for at least 10 minutes.
Complete the Top Layers
- Remove the frangipane paste covered pie crust from the freezer.
- Spread the chocolate ganache evenly over the frangipane paste layer. A frosting spatula is a great tool for this, but you can also use a clean silicon cake spatula.
- Sprinkle a pinch of medium grind sea salt over the ganache layer.
- Sprinkle the top layer of chopped pistachios (optional) over the pie.
- Gently press the chopped pistachios into the pie with a clean spoon, or clean fingers. The idea is for the chopped pistachios to sink in a little so they don't get loose and roll off when you cut the pie.
Chill and Serve
- Chill pie for at least 2 hours in the fridge before removing the springform ring and serving.
- This pie can be made several days in advance.


Leave a Reply