
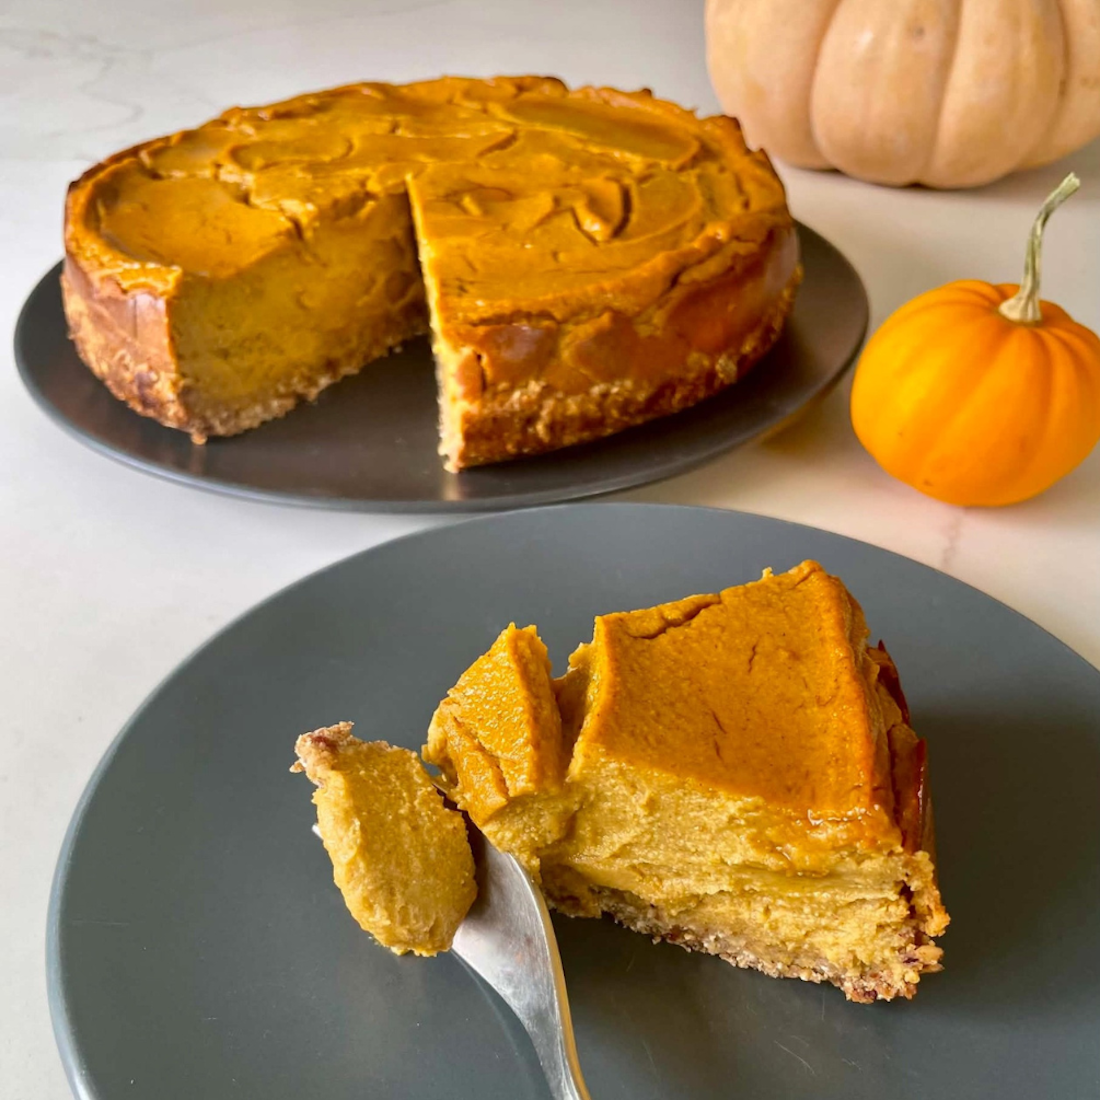
A rich melt-in-your-mouth dessert that’s whole food plant-based, easy to make and gluten-free. But wait, it gets better! Packed with protein and fiber, this lusciously creamy baked pumpkin cheesecake contains no added oil or refined sweeteners. It’s a Thanksgiving themed treat worthy of year round fandom.


MY NEW FAVORITE DESSERT
There’s no particular word for people who favor pumpkin and sweet potato based sweets in the same way that chocoholic describes passionate chocolate lovers. If such a word existed it would describe me to a tee. This pumpkin cheesecake embodies everything I love about the earthy nutty sweetness of winter squash and yam-based confections. I love how easy it is to make and that all the ingredients are non-perishable and shelf stable. Except for the canned pumpkin puree, everything I need for this recipe is already a pantry staple for me. And now that I’ve fallen in love with this cheesecake, I plan to add canned pumpkin puree to my list of must-have staples. I can make this cheesecake days in advance which is especially nice during the busy holiday season, with flavors actually improving on the second day. Although it’s packed with whole food plant-based nutrients, including formidable amounts of protein, the taste and texture feel absolutely indulgent, featuring a generous sweet, creamy, gently spiced filling cradled in a tender cookie-like crust that is as good, if not better, than vegan desserts relying on oil, refined sweeteners or coconut cream.
CHICKPEA CHEESECAKES ARE AWESOME
Using chickpeas to make cheesecakes is an idea that’s been trending for several years within the vegan foodie stratosphere. When cooked chickpeas are fully blended they break down into a soft, dense paste that mimics the heavy, creamy body of traditional dairy-based cheesecakes. The neutral flavor and color fit in seamlessly. Health-forward whole food vegans like myself appreciate being able to weave in a dose of whole legumes into desserts. We’re getting the life-extending nutritional benefits of beans while simultaneously introducing a binding agent that replaces eggs, an essential ingredient in traditional non-vegan baked cheesecakes. Other light colored beans like cannellini can be equally delightful in vegan cheesecakes. In fact, I have a fabulous recipe for a cannellini bean cheesecake. But for this particular recipe, the unique density of chickpeas is important so I wouldn’t recommend substituting a different bean.
FOOD PROCESSOR REQUIRED
There’s no way around it. You’ll need a medium to large food processor to make this recipe. That’s where the crust is formed, then the filling. You could use a very large high speed blender for the filling, but I make both parts in my food processor. When I say a medium to large food processor, what I mean is that it should hold at least 50 fluid ounces (about 1.5 liters) or 6¼ cups. All this being said, your food processor doesn’t need to be particularly powerful or high end. With a little patience, a budget food processor is quite adequate. How I know is that I happen to be working with a bargain basement Hamilton Beach blender that’s ten years old and my cheesecake came out great.
PRE-SOAKING CASHEWS
For best results, the raw cashews need to be soaked before being added to this recipe. Soaking cashews make the cheesecake creamier. The ideal soaking time for raw cashews is at least two hours when starting with cold water. But if you start by pouring boiling water over the cashews, you can get away with a shorter soaking time. Using cashew pieces also reduces the total necessary soaking time. Cashew pieces are usually less expensive so it’s a win-win. Any amount of soaking is better than no soaking. When I know I’ll need soaked cashews the following day, I prefer an overnight soak.
DATES FOR SWEETENING
My sweet recipes get most of their sweetness from whole dried fruits. And my go to dried fruits for sweetening recipes are dates. Dates are intensely sweet with a rich caramel-like flavor that blends in seamlessly with other ingredients. From a nutritional standpoint, dates are a whole plant food packed with fiber and a symphony of other nutrients.
PREPPING DATES FOR BAKING
My favorite dates for baking are pitted Deglet Noor because they are sweet, flavorful, widely available and usually soft and moist. When I bake with dates I always begin by slicing or chopping them. I have found that dates that are supposedly pitted are, in fact, usually not all pitted. Pre-cutting my dates gives me the opportunity to remove any hidden pits and hard stems that may still be attached. In recipes like this one where the dates will be processed in a blender or food processor, cutting the dates allows them to be processed more quickly and effectively. Finally, slicing or chopping dates allows for greater consistency when measuring. Once the dates are cut they can be pressed into measuring cups.

LINING THE CAKE PAN
I like using a 9 inch (approximately 23 cm) springform cake pan for this recipe because this size gives my pumpkin cheesecake an ideal height. A dedicated 9 inch cheesecake pan (aka a push pan) is also fine. The sides of the pan should not be lined or otherwise stick-proofed because the batter needs to cling to the sides in order to rise properly. You do need to line the bottom of the pan with parchment paper, however, so that you can easily transfer the cheesecake out of the pan after it’s chilled and ready to serve. The best way to line a springform pan for this cake is to start by removing the outer ring from the flat bottom base. Then lay a sheet of parchment paper flat over the center of the base, letting the excess paper hang over the edges. Now place the outer ring back over the paper and base, pushing it down firmly, and snap the side latch closed, trapping the parchment in place. Finally, use scissors to trim away the extra parchment paper extending beyond the sides of the pan. If you want you can leave up to an inch or more of extra paper around the sides to help lift out the cheesecake when it’s ready to serve.


CREATING THE CRUST
To create the crust start by placing the rolled oats in the bowl of a food processor and pulse until you create a coarse meal that stops short of being flour. The idea is to grind them up a little without totally breaking them down into oat flour. To the ground oats in the food processor add the chopped dates, almond flour and two tablespoons of water or plant milk. Pulse until the mixture clumps together to form a rough somewhat shapeable dough. Seeing tiny pieces of dates and discernible oat segments is fine. Depending on the moisture level of the dates you use, you may need to add one or two more tablespoons of liquid. As you can see in the fourth photo below, I needed to add another tablespoon of liquid to get the results I wanted.


Now you’re ready to transfer the crust into your lined cake pan. Using your fingers, press the crust into an even layer that slightly slopes up the sides. It helps to keep a small bowl of water close at hand to dip your finger into and keep them wet while you’re working. Once the pie crust is pressed into place, set it aside and rinse out the food processor to prepare for the next step.


CREATING THE CHEESECAKE FILLING
The bowl of the food processor should be rinsed or wiped so that it’s free of crumbs from the crust before you make the filling. Place all the ingredients for the filling in the bowl of the food processor and pulse until you form the smoothest mixture possible. You’ll probably need to stop several times so that you can take off the lid of the food processor and use a silicone spatula to push down the sides. Be patient. Getting the mixture smooth might take five minutes or more. But you can’t over-mix this filling and patience pays off in the form of a creamier cheesecake. Once the mixture is smooth and all of the ingredients have been evenly incorporated, pour it over the prepared crust, spread it out as evenly as possible using a cake spatula.


BAKE, CHILL, GLAZE
Bake the cheesecake in a preheated 350 ℉ (175 ℃) oven for 55 minutes. After you remove it from the oven, let it cool in the fridge for at least 4 hours and up to several days without removing the sides of the pan. You can cover it with a plate, plastic or aluminum wrap once it’s cool down, but not right away because that would cause condensation. When the cheesecake has completely cooled, run a knife around the edge to make sure the sides pull away easily before you unclasp and remove the outer ring. Then, using a pastry brush, glaze it with one to two tablespoons of maple syrup and serve.


SUBSTITUTIONS AND VARIATIONS
- Top it with Nuts: To add an extra layer of richness and texture to this cheesecake you can top it with ¼ to ½ cup of toasted chopped pecans, walnuts or slithered almonds. Make the nuts prettier and more tastier by tossing them in 1 to 2 tablespoons of maple syrup before adding them to the top.
- Use a Different Spice Mix: Instead of pumpkin spice you can use the same amount of apple pie spice or make your own pumpkin spice mix by combining 1 teaspoon ground cinnamon, ½ teaspoon ground ginger, ¼ teaspoon ground nutmeg, ⅛ teaspoon ground cloves and ⅛ teaspoon allspice.
- Add Turmeric for Color: Ground turmeric is a healthy way to intensify the deep orange pumpkin color of this cheesecake. Just add ½ teaspoon of ground turmeric to the ingredients in the filling.
- Substitutes for Apple Cider Vinegar: Instead of apple cider vinegar you can use the same amount of distilled white vinegar, white wine or champagne vinegar or lemon juice. For a convincing dairy-like flavor you can leave out the vinegar and use ½ teaspoon of plant-sourced lactic acid.
- Substitutes for Almond Flour in the Crust: Instead of almond flour you can use a different nut flour. Hazelnut flour would be particularly delicious.
related recipes you’ll love


Pumpkin Chickpea Cheesecake (vegan, wfpb, gf, oil-free)

Equipment
- small bowl (for soaking cashews, 2 to 3 cup capacity or more)
- 9 inch springform cake pan (approximately 23 cm or something close to it)
- Parchment Paper
- scissors
- medium to large food processor (bowl or pitcher should have at least a 50 fluid oz capacity/ 1.5 liters)
- silicone cake spatula
- pastry brush (for final glazing)
Ingredients
For the Crust
- 1½ cup rolled oats (gf when necessary)
- ½ cup dates (packed), chopped then measured*
- ¼ cup almond flour
- 2 to 4 Tbsp water or plant milk
For the Cheesecake Filling
- 1 cup raw cashews (pieces or whole)
- 15.5 oz can chickpeas, strained
- 10.9 oz package shelf stable silken tofu, extra firm
- 15 oz can pumpkin puree (or approximate 1¾ cup pureed pumpkin flesh)
- ¾ cup dates (packed), chopped then measured*
- 2 Tbsp maple syrup
- 1 Tbsp apple cider vinegar
- 2 tsp pumpkin spice
- 1 tsp vanilla extract
For the Glaze
- 1 to 2 Tbsp maple syrup
Instructions
Pre-Soak Cashews
- Place raw cashews in a small bowl, cover with boiling water. Set aside and soak while you're preparing the potatoes and other vegetables. The longer the cashew soak the better. You can soak them up to 24 hours in advance if you prefer.
- You will need to strain cashews before adding them to the recipe.
Line Cake Pan
- Open the side latch of the pan and remove the outer ring from the flat bottom base. Then lay a sheet of parchment paper flat over the center of the base, letting the excess paper hang over the edges. Place the outer ring back over the paper and base, pushing it down firmly, and snap the side latch closed, trapping the parchment in place. Trim away the extra parchment paper extending beyond the sides of the pan using scissors. You can leave a little extra paper around the sides to help lift out the cheesecake when it's ready to serve.
Create the Crust
- Place the rolled oats in the bowl of the food processor and pulse until you get a coarse meal that stops short of being flour. The idea is to grind them up a little without breaking them down too much. For an idea of how your ground oats should look, refer to the photo in the main recipe text under the section titled CREATING THE CRUST.
- To the ground oats in the food processor add the chopped dates, almond flour and two tablespoons of water or plant milk.
- Pulse until the mixture clumps together to form a rough sticky dough crust. It's normal to see tiny pieces of dates and oat grains. Depending on the dryness of your dates and other ingredients you will probably need to add up to 2 more tablespoons of water or plant milk to achieve a dough-like consistency. For an idea of what your dough crust should look like refer to photos in the main recipe text.
- Once the dough crust clumps together, transfer it to the lined cake pan.
- Using your fingers, press the crust into an even layer that slightly slopes up the sides. It helps to keep a small bowl of water close at hand to dip your finger into and keep them wet while you're working. Set aside.
Pre-Heat Oven
- Preheat oven to 350 ℉ (175 ℃).
Create the Pumpkin Cheesecake Filling
- Rinse out the bowl, blade and lid of the food processor to remove crumbs.
- If you haven't already done so, strain the soaking cashews, discarding the excess water.
- Place all the ingredients for the cheesecake filling (including strained cashews) in the bowl of the food processor and process until smooth. You'll probably need to stop and push the mixture down from the sides of the bowl with a cake spatula several times. The mixture needs to be very smooth and you cannot over process it. This can take a while so be patient.
Create the Pumpkin Cheesecake
- Pour the filling over the prepared crust. Using a silicone cake spatula, spread the filling as evenly as possible over the crust.
- Bake the cheesecake in a preheated 350 ℉ (175 ℃) oven for 55 minutes.
- After removing the cheesecake from the oven, leave it in the pan without removing the sides and let it cool in the fridge for at least 4 hours and up to several days . Once the cheesecake has cooled down you can cover it with a plate, plastic or aluminum wrap. Do not cover it right away because that would cause condensation.
Unmold, Glaze, Enjoy
- Once the cheesecake is thoroughly chilled, remove it from the fridge and very gently run a knife around the edge to make sure the sides pull away easily before unclasping and removing the sides of the pan.
- Very carefully lift or slide the cheesecake from the base of the cake pan and place it on a plate or cake platter. This is where those parchment paper edges might come in handy. You can also gently lift the cheesecake on its side and peel away the parchment paper.
- Glaze the top of the cheesecake with maple syrup using a pastry brush. One to two tablespoons of maple syrup is all you need. The glazing process is like laying on varnish with a paintbrush.
- Serve chilled or at room temperature.



Leave a Reply